Pages

Friday, October 30, 2009

Refashioned Tshirt Hoodie Dress

After reading the very neat blog Lil Blue Boo and all of her super cute ideas I wanted to make my very own tshirt hoodie dress. (Not for me of course for my 2y/o).

So I made a quick stop at a thrift store and found this really cute top for $1.50.


I knew that was the one! When I got it home I found a shirt with a hoodie that I knew fit my little girl and used it as my pattern for the top of the dress.


I know some people just cut out around but I like to use chalk but will probably stop doing so the more I do this.


(Insert pause for me running up and down the stairs to help with schooling)

I cut off the bottom of the shirt where my lines stopped then cut out the rest of the top, front and back. Sewed it right sides together and then moved on to the sleeves.

(Insert pause to run up the stairs and get 2 dinners started one for us and one for a family that just had twins!! They are sooo cute!)

Since it is now getting to be cooler weather I wanted long sleeves. So I found another top that had sleeves that fit her arm length. And used it to cut off the ends of sleeves off of a black long sleeved tshirt that I also found for $1.5o.


When it came time for me to attach the sleeves I had no idea what I was doing. I've never attached sleeves before. So I quickly ran upstairs to find how to attach sleeves. Thank you, Sew, Mama, Sew!

(Insert break for doing more meal prep and schooling help)

I ran back downstairs and lined up the sleeve and top right sides together, sewed, and....


WALLAH!!

A top with sleeves!


(Insert break to make some elbow macaroni here)

Now for the skirt part of the dress. I cut the bottom off of the black formerly long sleeved tshirt. It had some cute pockets already and wanted to utilize those because my little girl loves putting her hands in her pockets.

(Insert long break to finish dinner. Deliver to the said family. Get lost on the way to their house and go in a BIG circle. What should have taken 2 minutes now took 20. Ooo and Aaah over the oh so cute twin boy and girl. Come home and eat dinner with family. Then try and put together a super confusing puzzle with husband and oldest daughter until bed time. Get everyone to bed for some peace and quiet.)


I then gathered (I hate gathering never turns out like it should for me) and sewed the skirt onto the bottom of the top.


And to make the bottom not so dull I added a rose using this tutorial from Happy Together.
So easy to do and I think super cute!!


Finally it was time to make the hoodie.
I took out the top from the beginning and use it's hood as a pattern. I originally wanted the hood to be the blue striped material but didn't have enough of it for the stripes to match in direction so I went with the same black tshirt.

Sewed the back part of the hood together then made a hem for the front. And attached the hood to the dress and...


It is finished!!

(Realize it is now 2am and I need to go to bed)

And the next day...


Wednesday, October 28, 2009

It's the Most Wonderful Time of the Year

Yes, yes, yes...it is that time of year again. "Christmas?", you ask. No, Christmas shopping!! (and crafting and sewing and whatever else you may do).

After finding out that we will be seeing my in-laws earlier than expected I thought I'd better get to work on all those gift ideas floating around in my head.

Here is one of the gifts:


These blocks will be turned into pot holders. A pair of them will be tied with twine onto a jar filled with cookie mix whose lid will also be decorated with some cute fabric.

The blocks were made with a Charm Pack "Let It Snow" and I was going to hit the fabric store for some backing but then found the Christmas Candy piece in a box of fabric that was given to me. It doesn't match perfectly but it's cute. My only problem will be finding a binding to match both sides.

Any ideas?

What are you making for gifts this Christmas?

Tuesday, October 27, 2009

I am a Refashionista!! (sort of)

lol I love reading all those blogs that give you such great little tutorials and show you how they amazingly re-purposed or refashioned an old article of clothing into something super cute. So awhile back while doing some laundry I came across this dress that belonged to my 6y/o:


It was a very cute dress with one problem. Stains. After multiple tries at trying to remove the stains (front and back) with no luck I usually would have just thrown this dress away. (It's not nice to give away a dress with stains on it.)

But, "AHA!", I said to myself, "I can re-purpose this into a cute skirt for my 4y/o!!"

So about 3+ months later I finally took it upon myself to finish this project and WALLAH!! the finished product:


Every piece of this outfit was re-purposed from something else. The skirt and all pink trim from the dress and the leggings were made from an old black maternity t-shirt.

I used a pair of shorts as the pattern for the leggings. I wanted them fitted so I had my 4y/o put on the shorts then pinned them so they were fitted. Then I when I cut out the pattern I cut 1/2 inch from the pin instead of the edge of the shorts.

The crotch area is a little too long but I'm not worried cause it gives her room to grow. I'll just know better next time.

This will be perfect as the weather is starting to get cooler even in sunny California.

I am still planning on adding a reverse applique pink heart to the bottom right of the skirt. Hopefully it will get done tomorrow. Too tired to finish it up right now. =)

Thank you Make It and Love It for the tutorial on making girl's pants. It gave me the idea to make the leggings instead of just shorts.

Thanks for reading! Please let me know what you think!

Wednesday, October 21, 2009

I Love Surprises! - CarryAll Clutch

I love surprises! And when I found out that I won a contest at Joy's Hope I was excited! The prize was my choice of a Sketcher Wallet or Carryall Clutch from Terri of Sew Fantastic's etsy shop, GetSassed.

I chose the Carryall Clutch and not long after it arrived in the mail. It hasn't left my side since. ☺

This cute notebook is so handy! Plus it comes with a notepad and matching pen (mine also came with a cute little thank you note). The pockets hold so many items. I like to carry around some blank note cards for writing notes to people when it comes to mind, my Starbucks giftcard which my husband got me, and tracts from our Church. I also stash my receipts in the pockets and this has saved me from finding them wadded up in my purse.

I use the notepad for E-V-E-R-Y-T-H-H-I-N-G. From grocery and shopping lists to prayer requests or just something or some idea I want to remember.


My Carryall Clutch has the cutest little bird applique on the inside but some of them have different items depending on the pattern of the fabric she uses.

These Carryall Clutches come in many different super cute fabrics. It was very hard for me to pick the one I did.


Want one of these cuties for yourself? Terri is having a Mix and Match Sale where you can, I quote,
"BUY ANY ITEM IN THE SHOP AND GET ANOTHER AT HALF PRICE."
Perfect for Christmas which is just around the corner! Please visit her shop for more details if you are interested.

*The photos above are from the GetSassed Etsy shop. Used by permission.

Thursday, September 24, 2009

Sewing in the Rough (and some Baby Shower Gifts!)

I finally blew the dust off of my machine and got to work. With a baby shower only 1 day away I needed to get cracking! My goal was to have a matching Nursing cover, 2 spit up cloths (one for each baby, she's having twins!!), and a diaper clutch ready by tonight. Well, I got 2 out of 3 done. The nursing cover and the spit up cloths. I had enough material to do the diaper clutch just not enough time.

I still didn't get my sewing area cleaned up I just worked around, on, and through it. I finally braved up and will show you a pic of what I worked through.


Everything I need an arm's length away! You just have to dig for it. lol My stash of mini-Snickers I think are the most important thing on this table. I learned this from Cassie at You Go Girl! just read her Pencil Roll Tutorial and No Snit Binding Tutorial and you'll see why.

No really, I don't like working with my table like this. Usually I would have cleaned it all off before starting but there was no time.

So now to the sewing! I finished up the nursing cover in good time. I still have one more to make for a friend of mine.


She loved the colors! YAY! I always try to ask about favorite colors and since her wedding colors were red and green (in July not a Christmas wedding) I thought she would like this fabric. Carnival Bloom by Michael Miller.

This time I added pockets on the inside bottom corners of the cover. I wanted to use a knit fabric but there were no white knit remnants at the fabric store so I re-purposed a onesie that Glory had outgrown.


I then moved on to the spit up cloths. I got my inspiration from this one:


It was a gift given to my sister-in-law's sister from her Sunday School class. The snag was that the lady who made them has a machine that does embroidery, hence the lovely lettering.

I do not.

When an amateur seamstress tries to copy above artwork on her own machine, freehand you get this:


Not Pretty.

I had already sewn on the fabric onto the bottom so after wasting time doing the above work I had to pull out Mr. Seam Ripper to take off the fabric and add it to another cloth.


See all the thread still hanging onto the ruined cloth.

Then I decided to use my lettering that my machine can do but thinking I had to enter in the letters a certain way I came up with this:


Luckily, I used a scrap piece of fabric to see how it would come out instead of wasting another cloth.

After correcting my mistakes my finished product finally came to this:


I really like how they turned out and I loved how everything matched!!

I usually don't give cards at baby showers. Since I'm right there when they open it I can let them know it's from me! =) But I thought I'd use a piece of scrap fabric to make a matching card as well.


Too pretty to wrap up! This fabric is awesome!

The diaper clutch never made it even to the cutting board but since I have enough fabric for it I'll still be finishing it up and getting it to the Mommy to be.

It has been awhile since I was sewing last and I really enjoyed getting back to it. The Lord has really blessed me with a wonderful way to create lovely things for my friends and family (and for myself ☺).

Sunday, September 20, 2009

As the Dust Piles Higher...

...on my machine and craft table I sigh, *sigh*.

I would share a picture of the natural disaster that is my craft/family room (the other half of my bedroom) but I am way too embarrassed to do so. It is in such a state that I can't DO anything!! I've got a lot of projects that need to be worked on but alas there is no room to do it. So this week on my to do list is to put back in order my craft/family room (the other half of my bedroom).

So to keep you entertained since I have no amazing WIP or just finished project to share with you I'll leave you with this. A video I made using Animoto. A very cool way to make your photos into a fabulous slide show/video. It's the first one I've every done and I think I'll be making more of them.

Collins' Family Adventure

Sorry, I couldn't figure out how to get the video directly on my post so I had to use a link.

Thursday, September 10, 2009

In Between Getting Things Done....or Learning to Applique

I decided to do a little embellishment work today in between loading the dishwasher and laundry.

It started with folding a pink long-sleeved t-shirt that has a permanent stain on the front.

"I can cover that with a charm square!"

"Let's make it a heart so it's really cute."

(Putting my chores aside to get on the computer again to look up how to applique a t-shirt)

"Yes I have everything!"

The Finished Product!!

It turned out so cute (I thought so at least and so did Madison).

She's not used to posing though. =) I don't know what's up with those hands!! lol


I finally posed her myself.


But did I stop there? NO!!

"I've been wanting to do something cute with one of Caleb's onesies."

"Here's a onesie that could use something!"

"I have some cute fabric from another onesie he's outgrown already!"

"Let's use some of my new embroidery talents."


TA DA!!


And even better is this picture!!


Ok, so he looks a little like a Sneech but the star didn't look that low when the onesie wasn't on him. lol Next time I'll know to put it a little higher. =)

I'm very pleased with how it all turned out so I'll definitely be looking for more things to be adding special touches to.

Have you tried applique yet? If not you really must it's a lot of fun!!

Wednesday, September 9, 2009

I Spy with My Little Eye.....................


PUPPETS!

lol (yes that is my hand in the puppet named "Mama")

I finally had a lightbulb moment the other day. I've been wanting to make some "I Spy" bags for my girls but I always bemoaned the fact that I didn't have any of that clear plastic for the window and didn't know where to get any. (Actually I did but didn't know it, hence the lightbulb moment)

While reading the blog Make it and Love it I had my...


...moment. It's just plastic vinyl like the kind bedding comes in when you buy it en masse from Walmart. I've always got one of those bags somewhere in this house (plus it helps that the night before we bought loads of bedding for our 3 girls). So I set about making my own "I Spy" bags.


(If I had more time I would have added "TA DA!" over the top of those bags in Gimp2)

Actually these bags cost me nothing but some time (if you don't include the original price of all the stuff I used to make them) since I just used stuff I had laying around the house.

The fabric is fleece from my youngests outgrown pj's.

A whole new look on "Holey Pajamas" These would get lots of ventilation in summer time. ;)

The purple pj's had some cute appliqued flowers on front so I cut that out first for the back of one of the bags.


My middle child wanted hers cut out of the brown pj's but there wasn't enough left to make the size of bag needed so I made her a special M applique for her bag. It was my first time doing applique too. I need to do it more.

There are 30 items in each bag then I filled each with 8-10 oz. of rice. The kids love them (I love them, once you start playing they are hard to put down!) These are gonna be great on our road trip to the Bay Area next week. =)

Now I know you've been wondering, "But what about the puppets?" And I won't leave you hanging. Today we made sock puppets. (I shouldn't even be mentioning them because there was no sewing involved) I attached everything by Hot Glue Gun and raided my scrap fabric stash for their hair and any clothing.

The girls played with them for all of 1/2 a second right when they were done. =) Ahhh, the joys of Motherhood.

Sunday, September 6, 2009

Rolled Rose

When I first came into the world of sewing I started reading everything I could find on the web and I came across Sandi Henderson's Blog Portabellopixie.
She has a Rolled Roses tutorial on her blog for download and I've had it saved on my computer for months. I finally got it out and made one. I used some pink batik from my stash and a bead that was rolling around on the floor (my eldest wanted marbles and cut apart one of her play necklaces).
It did take me 2 tries to get it together but once I figured it out and got it going it was easy. I used a safety pin and wore it with my outfit for the Sunday PM service. This little flower is so cute I'm definitely gonna make myself some more for pins, hair clips for my girls, and bag and clothing embellishments. Have some free time or got nothing in your hands while watching tv? Then I suggest making a few of these!

Saturday, August 29, 2009

Did you hear the one about....

....

Actually, there is no joke. I have a hard time with titles they all seem to be pretty boring after I post them.

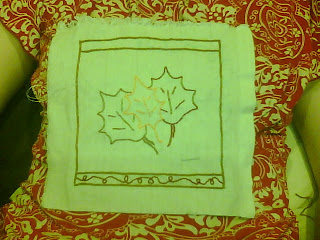
Just checking back in here to keep you up to date on what I'm working on. Yesterday I wanted to get out my embroidery again and I don't like all the time it takes to trace out a pattern so I decided to wing it. Sort of.

I pictured in my head what fall leaves should look like then I drew one on my linen. After I stitched it I drew two more on either side of it. They didn't turn out exactly as I was hoping (I have a graphic I wanted to use but my husband had the computer and I couldn't get a look at it) but I'm liking it. It's something that I made.

After the leaves were done I wanted to add something for the border in a nice color. However after I finished it up it made the acquaintance of Mr. Seam Ripper. I then put it away to get a fresh idea of what to do in the morning.

So today I figured what I wanted and now it's almost done. I've paused to write this post about it before I finish the last bit of stitching. Then I'll find some coordinating fabric in my stash to make it a nice fabric frame (something I saw at a friends house gave me the idea).

Sorry in advance about the pic quality. I used the webcam on my laptop. The colors are brown, gold and dark red. The border is brown and the curly cues are dark red. (Yes I know they aren't quite real to life looking leaves but hey I said I was doing it off the top of my head. My husband called the gold one a holly leaf.)

Wednesday, August 26, 2009

Hand-stitched Binding and Sports

I enjoyed working on these pot holders. I've needed new ones for quite some time so I finally decided to make myself some. I used fabric from the Fresh Squeezed charm pack by Moda.


It was my first time hand-stitching a binding and I found this ladder stitch tutorial at "Turning Turning" to be a big help. Surprisingly I liked how my first one turned out better than my second one. I stitched the binding while watching multiple sports channels with my husband. It's something I can sew while sitting with him instead of at the machine.

I got the grommet idea from Cassie at You Go, Girl!. She also has a great tutorial for binding. I didn't use it though because I lack a walking foot.

Here is an upclose view of the stitching I used.

Tuesday, August 25, 2009

I've Been Tagged


Yesterday Glenna at Your Fabric Place sent an email telling me I had been tagged & given a blog award.
The award states that you give 7 facts about yourself and “tag” 7 fellow bloggers.

So here goes with the 7 things about me!

  1. I am a naturally shy person. Most people don't know this b/c of the "job" I have as a Pastor's wife. "The ministry is people!"

  2. I mix white rice with tartar sauce! (Don't knock it 'til you try it!)

  3. I have loved horses and have wanted one since I was a kid but my mother always told me, "You can get one when you get married!" Well, now that I'm married and 4 kids later I realize it will be quite a few more years before I can look into it. So I content myself with decorating my house with horses. =)

  4. I have a violin that I have not touched in 2+ years! (That looks awful!) I want to pick it up again soon and take lessons again.

  5. I love Disneyland more when I take my kids with me. The wonder on their faces is priceless!

  6. My most favorite meal in the whole world is Chicken-stuffed dumplings. My mom would make it for me on my birthday. Now I make it for myself from time to time. Which reminds me that I need to put it on our menu soon.

  7. *Edited to say: Due to a couple of requests I added a link to the recipe.

  8. I realized I was a sinner and couldn't get to Heaven on my own good works. And at the age of 16 I asked Jesus Christ to forgive me of my sins. Now I'm apart of God's family and that brings joy and peace into my life like nothing else can bring.


Now for the 7 bloggers I need to pass this on to. These are all blogs I love to read and hope you'll enjoy them as well!

You Go, Girl!
Tammy's Times
My Spare Time
Making More with Less
Joy's Hope
By Grace
Amazing Mae